

Table of Content
- Introduction.
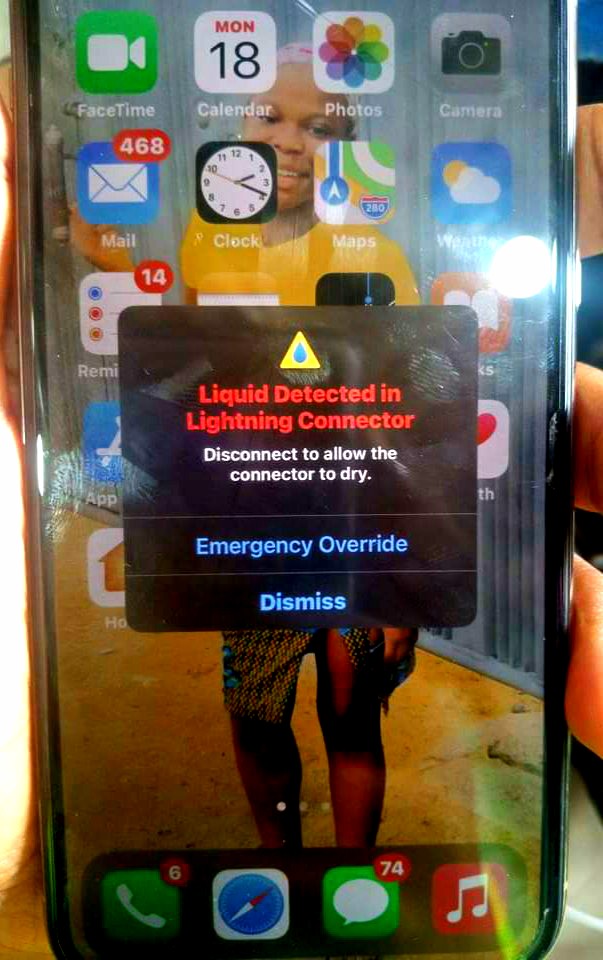
- Charging not available Liquid has been detected in Lightning connector explained.
- Causes of Liquid detected in Lightning connector on iPhones.
- "Liquid has been detected in Lightning connector" error message solution.
- Conclusion.

Several iPhones plagued with such issue have been fixed without any recurring problem. That was fine, Until when a client that was not nearby called to report his phone with same issue, I described what he had to do, he did, and then he called to appreciate, then said one thing which struck me; he said “Can you believe I've done several searches on Google and checked different forums yet I couldn't find the valid answers that helped me fix my iphone.” I at first thought it was a joke, then I decided to also check several blogs, but I couldn't find any that described the method that has always solved the issue of liquid has been detected in Lightning connector.
Mind you I have a blog too on which you maybe reading this right now, but still no valid answer onnet. This has pushed me into having to publish this blogpost tonight to help someone out there who may also be bugged with this challenge.
Firstly let me explain "Charging not available Liquid has been detected in Lightning connector"
iPhones are manufactured with IP ratings meaning they're dustproof and waterproof. An iPhone that has never been opened (repaired) retains the ability to withstand exposure to water for several minutes. Many people go to beaches and swimming pools with their iPhones safe with them while some others walk in rain with their iPhones. There's no problem about that as long as your iPhone retains it's water resistivity. The problem is with your iPhone giving out signs like the one we're discussing. Is an IP certified device supposed to showcase such problem?
Yes!
If your lightning connector is not dried enough, it will very much display Liquid detected message when you plug in a charger.
However, the big problem is when your iPhone displays Liquid detected message whereas your iPhone is dried and never neared water; you pretty much want to know more right? Let us discuss the causes of Liquid detected error message on iPhones.

Causes of Liquid detected in Lightning connector on iPhones.
First Cause: A bad Charging cable.
A defective charging cable has always been the reason for Liquid detected in Lightning connector error message on 70% of most iPhones. The sensors on the iPhone Lightning connector flex are somehow tricked that there's moisture content on the lightning connector whereas it is not so. This could be as a result of old charging cable, or charging cable with damaged or bridging internal connection.
MUST READ: STEP BY STEP GUIDE ON HOW TO FIX NON-GENUINE WARNING MESSAGE OR IMPORTANT BATTERY MESSAGE
Second Cause: Water around the Lightning connector.
Like I said earlier, there are special programmes used on iPhones by Apple to prevent damages. One of them is Liquid detected in Lightning connector message. When there's water present in the lightning connector, passing current through the water present there will fasten the corrosion and make the Lightning connector corroded. When your lightning connector get corroded there's no way your iPhone is going to charge without having to repair it. To avoid this it is necessary to avoid moisture from entering your lightning connector.
Third Cause: Software bug.
I noticed that users who reported this issue are running their iPhones on either iOS 13, 14 or 15. One in twenty iPhones reported for Liquid detected in Lightning connector error message was as a result of a software bug; a defect in the current operating system. Every technology company try their best to release the best OS experience for their userbase, but there's no way this will not come with atleast a bug. Apple is not exception, except for the fact that they're always quick to fix it.
Fourth Cause: Bad charging flex (Lightning connector flex).
This is a rare case that happens when the sensors on the lightning connector flex have gotten damaged over time leading to this incessant error message. Water could have also gotten inside the flex without you knowing it.
Fifth Cause: A bad PCB.
This is the rarest cause of this issue because I've not received any iPhone with the problem and found the cause to be a bad PCB, however, I am not saying it is not possible. When an iPhone's PCB suddenly get short, voltage meant for a certain line would be interfering with another, thereby making the phone to misbehave. The balls under the CPU could get short due to expansion and contraction during overheat and a short can lead to anything, one of which is liquid detected error message.
How then do we resolve this issue?
"Liquid has been detected in Lightning connector" error message solution.
First solution: Check out a new charging cable.
This has solved many iPhones with this issue and will still continue being a very good solution and may be the solution for you reading this article. You can get a new charging cable from Apple store, or any trusted offline outlet. You could try to test the cable of anybody around you to be sure it is your cable's fault before going to ahead to order or get a new charging cable.
Second solution: Leave the iPhone to dry.
If you found out any water traces or any form of water in your iPhone, leave such phone and let it dry out by placing in a cool place with proper airflow. You can also make use of hairdryer or hot gun but with a very minimal temperature.
Third solution: If after you have done the above two steps the issue continues to persist, then it is time to update your iPhone's software.
You can update iPhone's software using any of these five methods:
- iTunes / Finder.
- Reiboot.
- Fixppo.
- Manual system update.
- 3utools
How to update iPhone using iTunes/Finder:
iTunes works on Microsoft Windows PC while Finder works on Apple MacBooks.
How to update iPhone using iTunes on Windows PC:
•Download the latest version of iTunes on your PC (you cannot download latest version of iTunes on Windows version 8 and former, ensure your Windows version is updated atleast version 10).
•Connect your iPhone to the PC via USB cable.
•Open iTunes on the PC.
•On some PCs, there's an auto pop up that a device is connected while for some others, you would need to click on the iPhone icon (an iphone image) on the upper left corner.
•You will see a summary of your device's information like current storage, current Operating System version, etc.
•Click on check for update and wait for few seconds.
•If an update is available it will start downloading immediately and eventually install. If not you will get a pop-up saying your iPhone is up to date.
•Ensure your iPhone is connected to your PC through the entire process. Do not use a shaky cable because a not completed update might brick your iPhone. Unplug your iPhone after your iPhone has fully rebooted and the update is completed.
Note: Don't forget to create a backup for your files, though it's a very rare case but sometimes iPhones get bricked during a software update.
How to update iPhone using Finder on MacBook:
•Connect your iPhone to the MacBook via cable or wireless tethering connection.
•Open Finder on the Macbook.
•Click on the iPhone icon in Finder sidebar menu.
•Click on check for update and wait for few seconds.
•If an update is available it will start downloading immediately and eventually install. If not you will get a pop-up saying your iPhone is up to date.
•Ensure your iPhone is connected to your MacBook through the entire process. Do not use a shaky cable because a not completed update might brick your iPhone. Unplug your iPhone after your iPhone has fully rebooted and the update is completed.
Note: Don't forget to create a backup for your files, though it's a very rare case but sometimes iPhones get bricked during an update.
How to update iPhone using Reiboot:
•This is not a free tool like iTunes and finder. Download ReiBoot application on PC or MacBook.
•Connect your iPhone via USB cable and wait until it gets detected.
•Click Start on ReiBoot.
•Now you will see two options, click on the standard repair option.
•Next you will be provided with an option to download the best firmware for your iPhone.
•Click on the download button and the application will search for the best firmware and download it.
•You will have to be patient because this process take quite sometime to complete.
•Once the firmware is completely downloaded, Click on Start Standard Repair. After it is done, the screen will show a finished message and a done button beneath.
How to update iPhone using Fixppo:
•Although Fixppo is a very good tool for iPhone, it comes with a paid version. And yet there's a free version.
•Search imyfone fixppo for iOS on Google and open the Fixppo website.
•Scroll down to the end of the page and click on download Fixppo for PC.
•Download and install the Application.
•Open the application and click on standard repair.
•Click on download suitable firmware for device.
•Wait until download completes.
•Click on start standard Repair. After it is done, the screen will show a finished message and your iPhone will reboot.
How to update iPhone manually (Over the air update or OTA update):
•Open settings app from the home screen on your iPhone.
•Click on General.
•Select About.
•In About, you will see your iPhone information like serial numbers, current storage, current iOS version, etc.
•Go back to General.
•Select Software update. Wait for few seconds
•Your iPhone will either state it's up to date, or it'll give you the option to download the latest update if you're on an outdated version.
•Click Download And Install.
•Agree to the Terms of Service once they pop up.
•Once it finishes downloading and preparing the update, connect your iPhone to a charger. Make sure it stays plugged in the whole time, until the update finishes getting installed.
•Once it reboots, you can follow the previous steps to make sure it has successfully installed the update and that you’re running the latest version available.
You can also use 3utools to reset and/or restore your iPhones.
List of iPhones that can be updated to the latest iOS version as of now:
iPhone 13
iPhone 13 Mini
iPhone 13 Pro
iPhone 13 Pro Max
iPhone 12
iPhone 12 mini
iPhone 12 Pro
iPhone 12 Pro Max
iPhone SE (2nd Generation)
iPhone 11
iPhone 11 Pro
iPhone 11 Pro Max
iPhone Xs
iPhone Xs Max
iPhone XR
iPhone X
iPhone 8 Plus
iPhone 8
All I've been saying since is how you can update your iOS version. Updating the iOS version fixes the bug that is present in your current version causing Liquid detected error alert.
Fourth Solution: Replace the iPhone's charging flex.
Now that you have tried out the above slated solutions and still it doesn't seem to work out, this could be as a result of a damaged sensor on the Lightning connector flex causing the insistent liquid detected error alert. Now it is time to move to the hardwares.
Watch how to disassemble iPhone X series:
Simply Get a perfectly working lightning connector flex from a repair part sales store for your exact iPhone model or you can order from eBay or AliExpress.
Replace it by following the above steps in the video for lightning connector only.
Watch how to disassemble iphone 11 series:
Simply Get a perfectly working lightning connector flex from a repair part sales store for your exact iPhone model or you can order from eBay or AliExpress.
Replace it by following the above steps in the video for lightning connector only.
Watch how to disassemble iPhone 12 series:
Simply Get a perfectly working lightning connector flex from a repair part sales store for your exact iPhone model or you can order from eBay or AliExpress.
Replace it by following the above steps in the video.
Watch how to disassemble iPhone 13 series:
Simply Get a perfectly working lightning connector flex from a repair part sales store for your exact iPhone model or you can order from eBay or AliExpress.
Replace it by following the above steps in the video.
Fifth Solution: Check the lightning flex connector for any damage
Sixth solution: Check circuit components voltage using schematic diagrams for your iPhone model.
You can get schematic diagrams online. Check if each circuit component is getting it's appropriate voltage.
Seventh Solution: Reball and/or Replace CPU.
iPhone make use of their patented A chips on their processing system grid array. This should be handled by a professional as this requires expertise and patience
Eighth Solution: Replace the PCB (Printed Circuit Board).
Conclusion
Now I've explained all methods to fix Liquid detected error message on iPhones. While solutions 1,2,3 commonly does fix the issue, the rest of the solutions come in handy when you have a very stubborn iPhone with you. If you have any section that remains unclear do let us know via comment box. Also if you have your iPhone fixed by some other method that is not slated here, perhaps a very rare cause, also feel free to share via comment box.


